
Wireless testing is the process of evaluating the performance, security, and compliance of wireless devices and networks. It is used to ensure that wireless devices meet regulatory requirements, function as intended, and are not vulnerable to attack.
Step 1: Select option 3 in the main menu of the tool i.e. Wireless Testing..
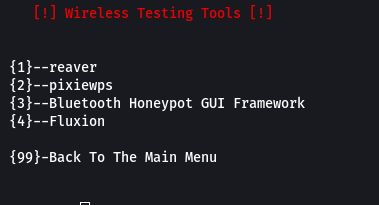
Step 2: Select option 1 i.e. reaver, and the tool will start installing.
Reaver is a tool that can be used to brute-force the WPS pin of a WiFi router. WPS is a feature that allows users to easily set up a WiFi network by entering a PIN on the router and on the client device. However, WPS has been found to be vulnerable to brute-force attacks, which is where Reaver comes in. Reaver works by sending a series of packets to the router that forces it to try all possible WPS PINs until the correct one is found. This can take a long time, depending on the length of the PIN, but Reaver can be used to crack even the most complex PINs.
Step 3: Open a new terminal and enter the following command to set up the wireless device in monitoring mode.
sudo airmon-ng start wlan0
Here wlan0 is your wireless interface.
The command airmon-ng start wlan0 is used to put the wireless interface wlan0 into monitor mode. Monitor mode is a mode where the wireless interface can capture all packets on the network, even if they are not directed to the interface.

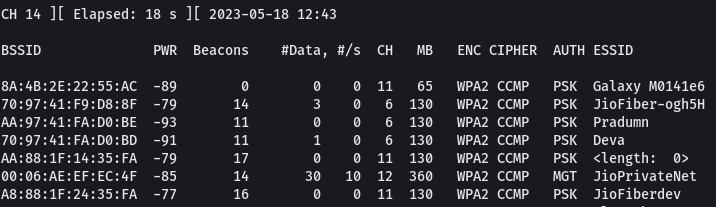
Step 4: Now, enter the following command to list out the information of the wireless networks around you.
sudo airodump-ng wlan0mon
This command is often used to collect information about wireless networks, such as the network name (SSID), the BSSID (MAC address of the access point), the encryption type, and the signal strength. This information can be used to crack the wireless network password or to map out the layout of a wireless network.
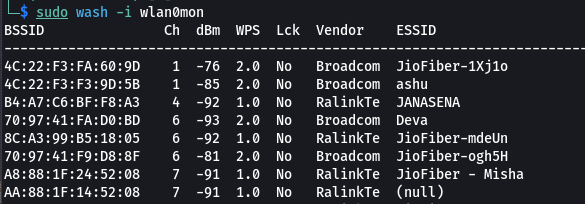
Step 5: Now we need to know which wifi device has open WPS. So for this, enter the following command.
sudo wash -i wlan0mon
Step 6: Copy the BSSID of the network you want to connect. Now enter the following command to start the attack.
reaver -i <interface> -b <bssid>
<interface> is the name of the WiFi adapter that you are using to connect to the target network.
<bssid> is the MAC address of the target WiFi router.
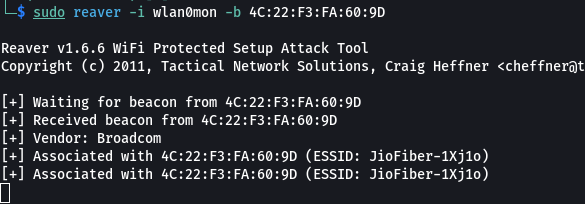
Reaver will start trying all possible WPS PINs. This may take a few minutes or even hours, depending on the length of the PIN. Once the correct PIN is found, Reaver will display the WPA/WPA2 PSK of the WiFi network. You can now use the WPA/WPA2 PSK to connect to the WiFi network without knowing the password.
Step 1: Select option 3 in the main menu of the tool i.e. Wireless Testing..
Step 2: Select option 1 i.e. reaver, and the tool will start installing.
Reaver is a tool that can be used to brute-force the WPS pin of a WiFi router. WPS is a feature that allows users to easily set up a WiFi network by entering a PIN on the router and on the client device. However, WPS has been found to be vulnerable to brute-force attacks, which is where Reaver comes in. Reaver works by sending a series of packets to the router that forces it to try all possible WPS PINs until the correct one is found. This can take a long time, depending on the length of the PIN, but Reaver can be used to crack even the most complex PINs.
Step 3: Open a new terminal and enter the following command to set up the wireless device in monitoring mode.
sudo airmon-ng start wlan0
Here wlan0 is your wireless interface.
The command airmon-ng start wlan0 is used to put the wireless interface wlan0 into monitor mode. Monitor mode is a mode where the wireless interface can capture all packets on the network, even if they are not directed to the interface.
Step 4: Now, enter the following command to list out the information of the wireless networks around you.
sudo airodump-ng wlan0mon
This command is often used to collect information about wireless networks, such as the network name (SSID), the BSSID (MAC address of the access point), the encryption type, and the signal strength. This information can be used to crack the wireless network password or to map out the layout of a wireless network.
Step 5: Now we need to know which wifi device has open WPS. So for this, enter the following command.
sudo wash -i wlan0mon
Step 6: Copy the BSSID of the network you want to connect. Now enter the following command to start the attack.
reaver -i <interface> -b <bssid>
<interface> is the name of the WiFi adapter that you are using to connect to the target network.
<bssid> is the MAC address of the target WiFi router.
Reaver will start trying all possible WPS PINs. This may take a few minutes or even hours, depending on the length of the PIN. Once the correct PIN is found, Reaver will display the WPA/WPA2 PSK of the WiFi network. You can now use the WPA/WPA2 PSK to connect to the WiFi network without knowing the password.